
If you frequently tow trailers, caravans, or heavy loads, installing a brake controller is essential for safe driving. A brake controller allows your trailer brakes to work in sync with your vehicle’s braking system, improving stopping power and preventing dangerous situations on the road.
Many vehicle owners believe wiring a brake controller is complicated, but with the right tools and instructions, it can be completed at home. In this guide, you’ll learn how to wire a brake controller safely and correctly, even if you are a beginner.
How to Wire a Brake Controller: Complete Step-by-Step Guide
What Is a Brake Controller?
A brake controller is an electronic device installed inside your vehicle that manages the electric brakes on a trailer. When you press your vehicle’s brake pedal, the controller sends electrical power to the trailer brakes, ensuring smooth and controlled stopping.
There are two main types:
- Time-delay brake controllers
- Proportional brake controllers
Proportional controllers are generally preferred because they apply braking force based on how hard you press the brake pedal.
Tools and Materials Needed
Before starting installation, gather the following items:
- Brake controller unit
- Vehicle-specific wiring harness (if available)
- Wire connectors or butt connectors
- Electrical tape
- Wire stripper/crimper
- Screwdriver or drill
- Circuit tester or multimeter
- Mounting bracket
Having a vehicle-specific harness can significantly simplify the wiring process.
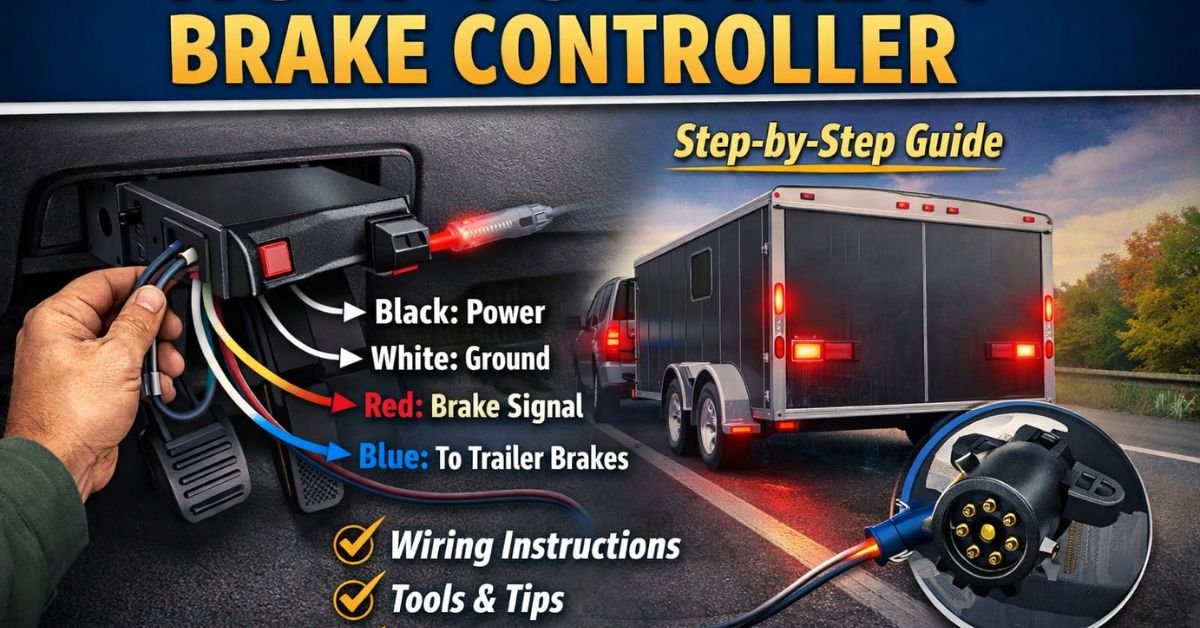
Understanding Brake Controller Wiring Colors
Most brake controllers use four main wires:
1. Black Wire – Power Supply
This wire connects directly to the vehicle battery through a circuit breaker. It provides constant 12-volt power to the controller.
2. White Wire – Ground
The white wire connects to the vehicle chassis or battery negative terminal for grounding.
3. Red Wire – Brake Signal
This wire connects to the cold side of the brake pedal switch. It activates the controller when you press the brake pedal.
4. Blue Wire – Trailer Brake Output
The blue wire runs to the trailer connector at the rear of the vehicle and sends braking power to the trailer brakes.
Step-by-Step Guide: How to Wire a Brake Controller
Step 1: Disconnect the Battery
Safety comes first. Disconnect your vehicle’s negative battery terminal to prevent electrical shorts or accidental shocks during installation.
Step 2: Mount the Brake Controller
Choose a location under the dashboard that:
- Is easily reachable by the driver
- Does not interfere with driving
- Allows the controller to sit level
Secure the controller using the provided mounting bracket and screws.
Step 3: Connect the Ground Wire
Attach the white ground wire to a clean, unpainted metal surface under the dashboard or directly to the battery’s negative terminal.
A poor ground connection can cause braking problems, so ensure it is tight and secure.
Step 4: Connect the Power Wire
Run the black power wire through the firewall to the vehicle battery.
Install a circuit breaker (usually 20–30 amps) between the battery and controller to protect the electrical system.
Connect the wire to the battery’s positive terminal.
Step 5: Locate the Brake Pedal Switch
Find the brake pedal switch located above the brake pedal.
Using a circuit tester:
- Identify the wire that only receives power when the brake pedal is pressed.
- Connect the controller’s red wire to this signal wire.
This connection tells the controller when braking begins.
Must Read: How to Turn Off Brake Light on Dashboard?
Step 6: Run the Trailer Brake Wire
Route the blue wire from the controller to the rear of the vehicle.
Connect it to the brake output terminal on your 7-way trailer connector. Secure the wire along the vehicle frame using zip ties, keeping it away from heat or moving parts.
Step 7: Reconnect Battery and Test
Reconnect the battery and test the system:
- Plug in your trailer.
- Activate manual override on the controller.
- Check trailer brake response.
- Adjust gain settings according to trailer weight.
Always perform a low-speed brake test before driving normally.
Important Safety Tips
- Never skip installing a circuit breaker.
- Avoid loose wiring connections.
- Keep wires away from exhaust components.
- Use dielectric grease to prevent corrosion.
- Double-check wiring before towing.
Incorrect wiring can cause trailer brake failure or uneven braking.
Common Wiring Mistakes to Avoid
Many installation issues happen because of simple mistakes:
- Connecting to the wrong brake switch wire
- Weak grounding connection
- Poor wire insulation
- Incorrect gain adjustment
Spending more time during installation saves money on future, expensive repairs.
Final Thoughts
Learning how to wire a brake controller is a valuable skill for anyone who tows regularly. Proper installation improves braking performance, enhances towing stability, and most importantly keeps you and others safe on the road.
While modern vehicles may include pre-wired ports that make installation easier, understanding the wiring process ensures you can troubleshoot problems whenever they arise.
If you’re unsure at any stage, consulting a professional installer is always a smart decision — especially when safety equipment is involved.